
Seed saving and ‘winter sowing’ are the easiest and most economical way to grow many native plants … and it’s fun!
Why Save Seeds?
- An easy way of introducing new plants to your landscape, especially ones that you cannot find in a Nursery.
- Plant propagation by seed provides a simple and economical way of raising large numbers of native plants.
- By propagating native plants from seed, the genetic diversity of the species will be maintained which helps create more resilient communities.
- You can share seeds.
- For the joy of watching your seeds grow!
A few things to know before collecting seeds
- Plants flower at different times so your seeds will appear at different times, usually around 6 – 8 weeks after flowering has finished.
- Collect seeds from the same species but from different plants and, if possible, different locations and different years which will ensure genetic diversity and more resilient plant communities.
- You can collect seeds from your own property or from other gardens, with permission.
- Collect seeds ethically. Seed saving is usually prohibited in National and Provincial parks, nature reserves and sanctuaries. It is unethical and illegal to collect seeds from endangered plants in Ontario. Do not collect more than 10% of seeds from any one plant. If there are signs that someone else has already collected (trampled grass, stripped or removed seed heads) you should not take any more. Native plant colonies need to be preserved and enough seeds need to be left for the creatures that depend upon them.
Supplies you’ll need
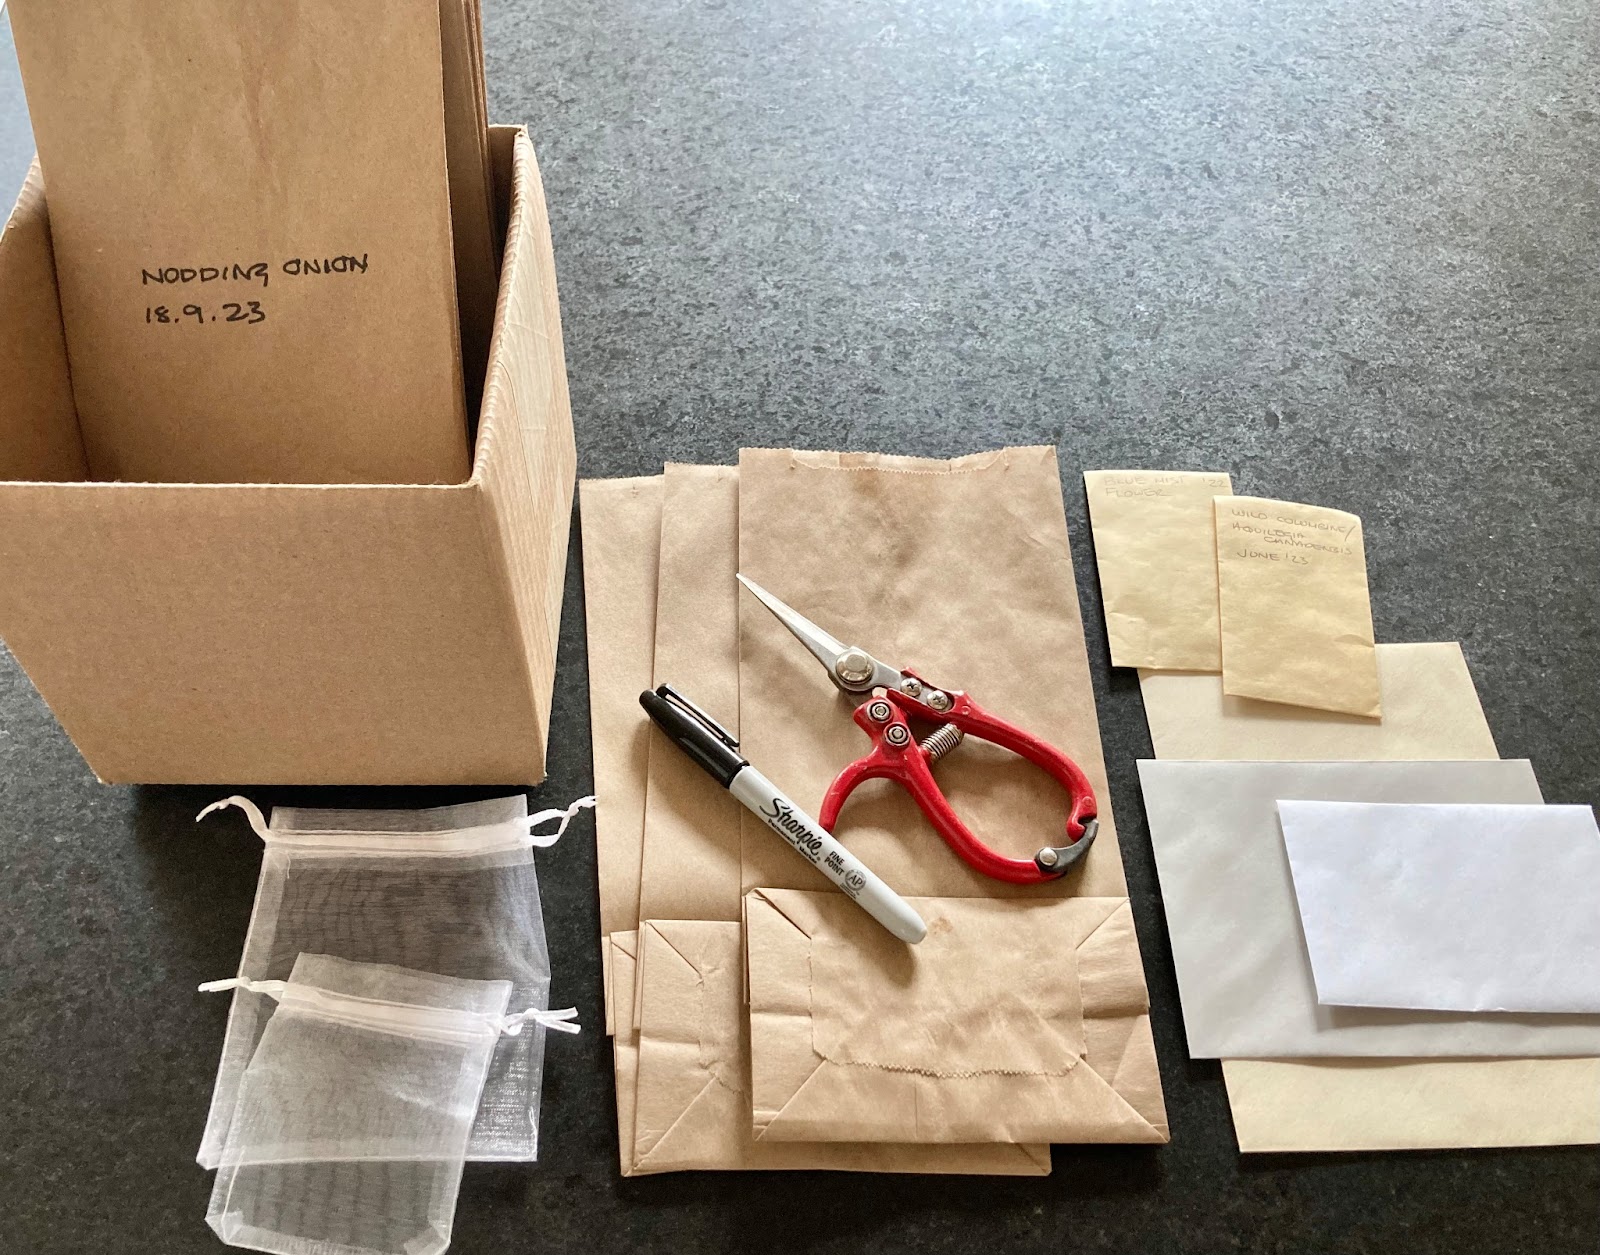
- Scissors or garden snips.
- Brown paper lunch bags (or any other paper bag) for the seeds
- A pen to label the bag with the type of seed and when and where they were collected.
- A container to put all your equipment in to carry around with you.
- Organza bags can be put over seed heads to catch seeds if you are not sure when the seeds will be ready. You can buy a large number of them very cheaply on Amazon.
- Envelopes to put seeds in once they are dry.
Seeds form from spring to fall and are ready 6 – 8 weeks after the flower has faded. If they are still green, they are immature and will not germinate.
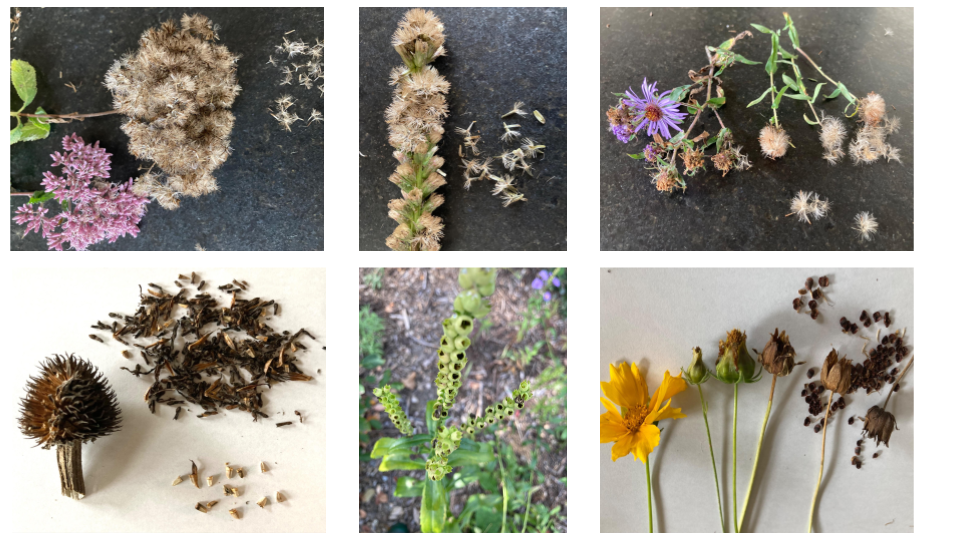
These pictures give you an idea of some immature and mature seeds ready for collection. Top left to right: Joe Pye Weed, Liatris, New England Aster. From bottom left: Purple Coneflower (the seeds are at the bottom of the picture and should not be confused with the dark chaff at the top). Obedient Plant (you can see the seeds in the openings), Lanceleaf Coreopsis (progression from left to right of seed heads until they are ready for collection).
Place the seed heads down, stalk up, in the bag. Leave the seeds to dry for two weeks or longer. When they are completely dry, a good shake should leave the seeds at the bottom of the bag. Transfer seeds to a labeled paper envelope until ready to use. Some sites recommend storing seeds in plastic bags or glass jars but the downside of this is that the seeds will rot if there is any moisture left in them.
Most seeds easily separate. For example: Anise Hyssop, Great Blue Lobelia, Obedient Plant, Asters, Goldenrods and grasses. Other seeds are a little more tricky, for example: Purple Coneflower and Rattlesnake Master are spiky and tightly packed. They take a little more work with either tweezers or cutting the seed head in half to access them. Separate the seeds from the chaff as best you can but most seeds fall without much effort. Tiny seeds like Goldenrod and Asters are attached to a small amount of fluff/floss and are fine left as is.
Store seeds until you are ready to Winter Sow.
Winter sowing was started by Trudi Greissle Davidoff in 2000.
Why Winter Sow?
- It’s a low maintenance/high germination method of starting seeds outdoors in containers, subject to all the elements.
- Containers protect seedlings from washouts and critters.
- Moisture levels are maintained to satisfy the cold moist stratification needs of the seeds.
- Seeds are contained, which is especially useful to keep track of them if you have a large garden.
- Strong resilient seedlings are produced, often flowering the first year.
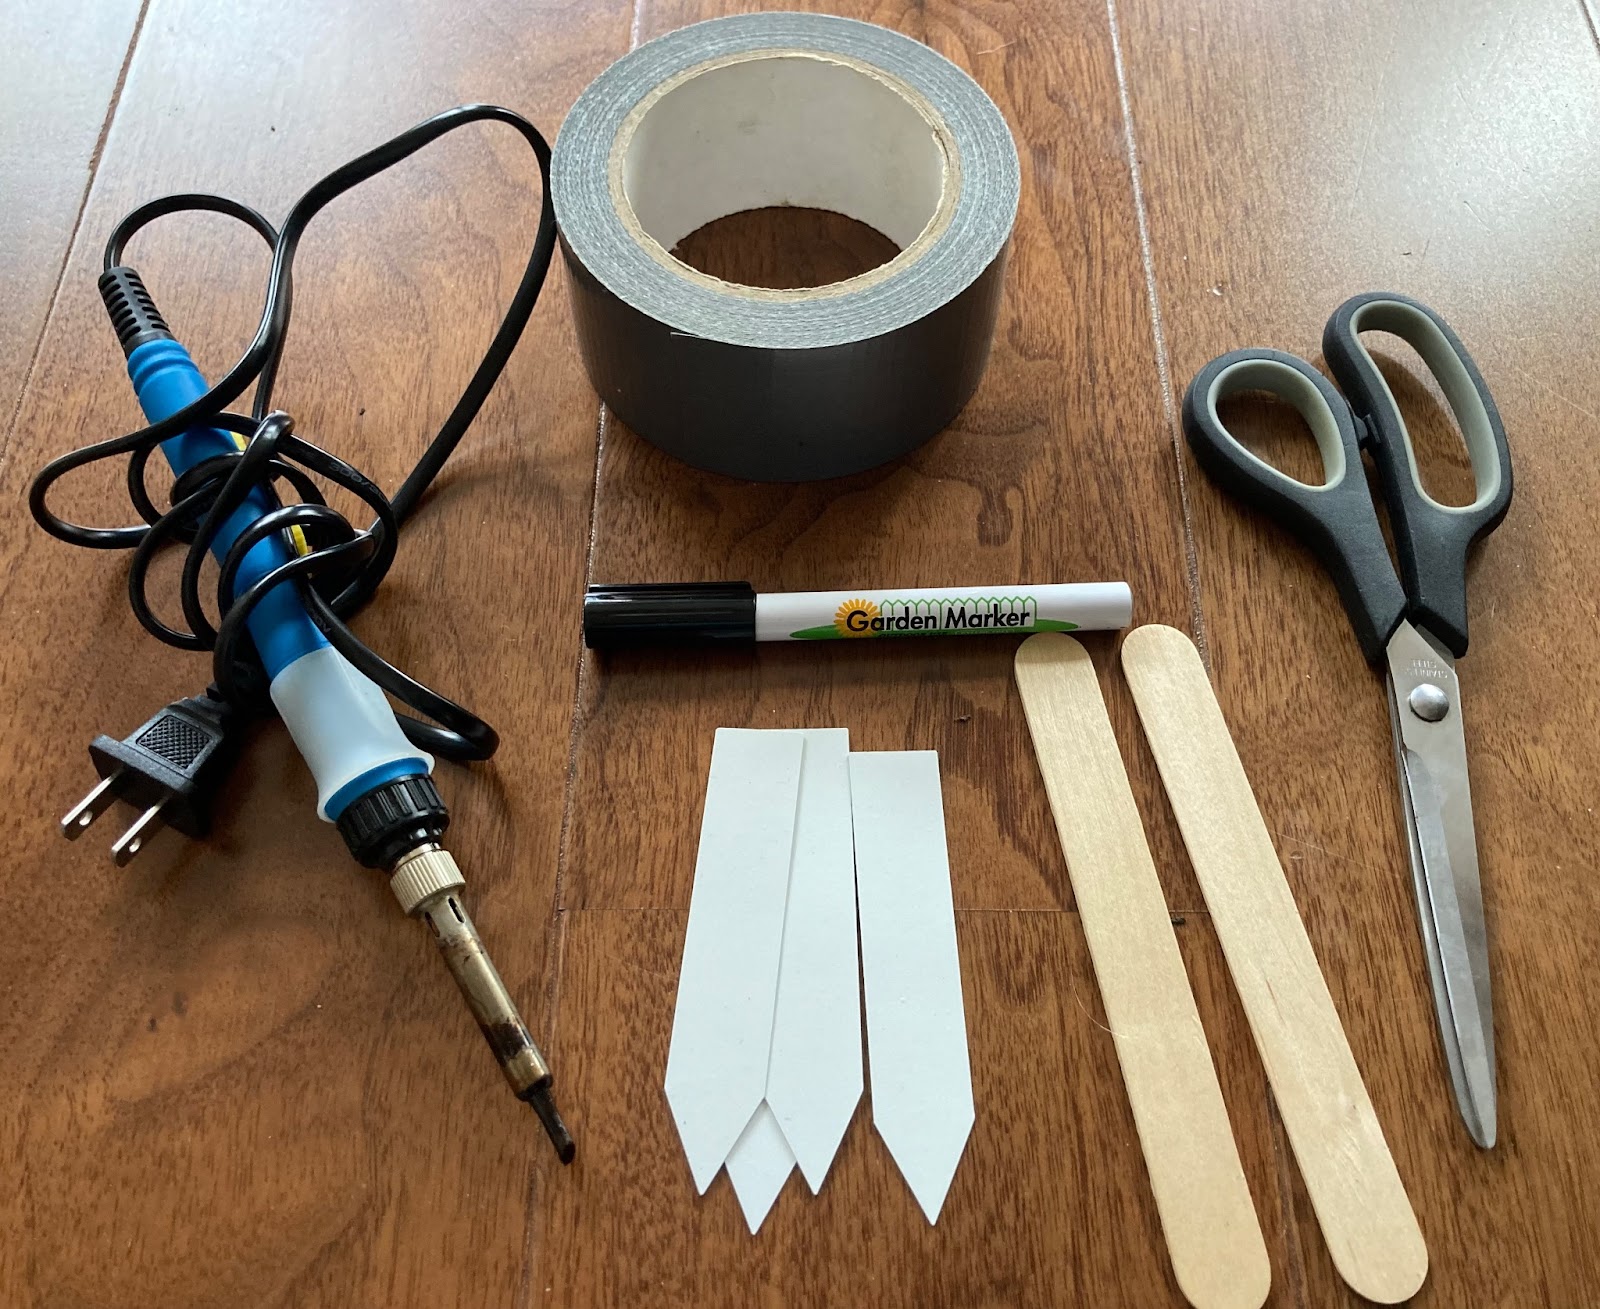
Supplies you’ll need
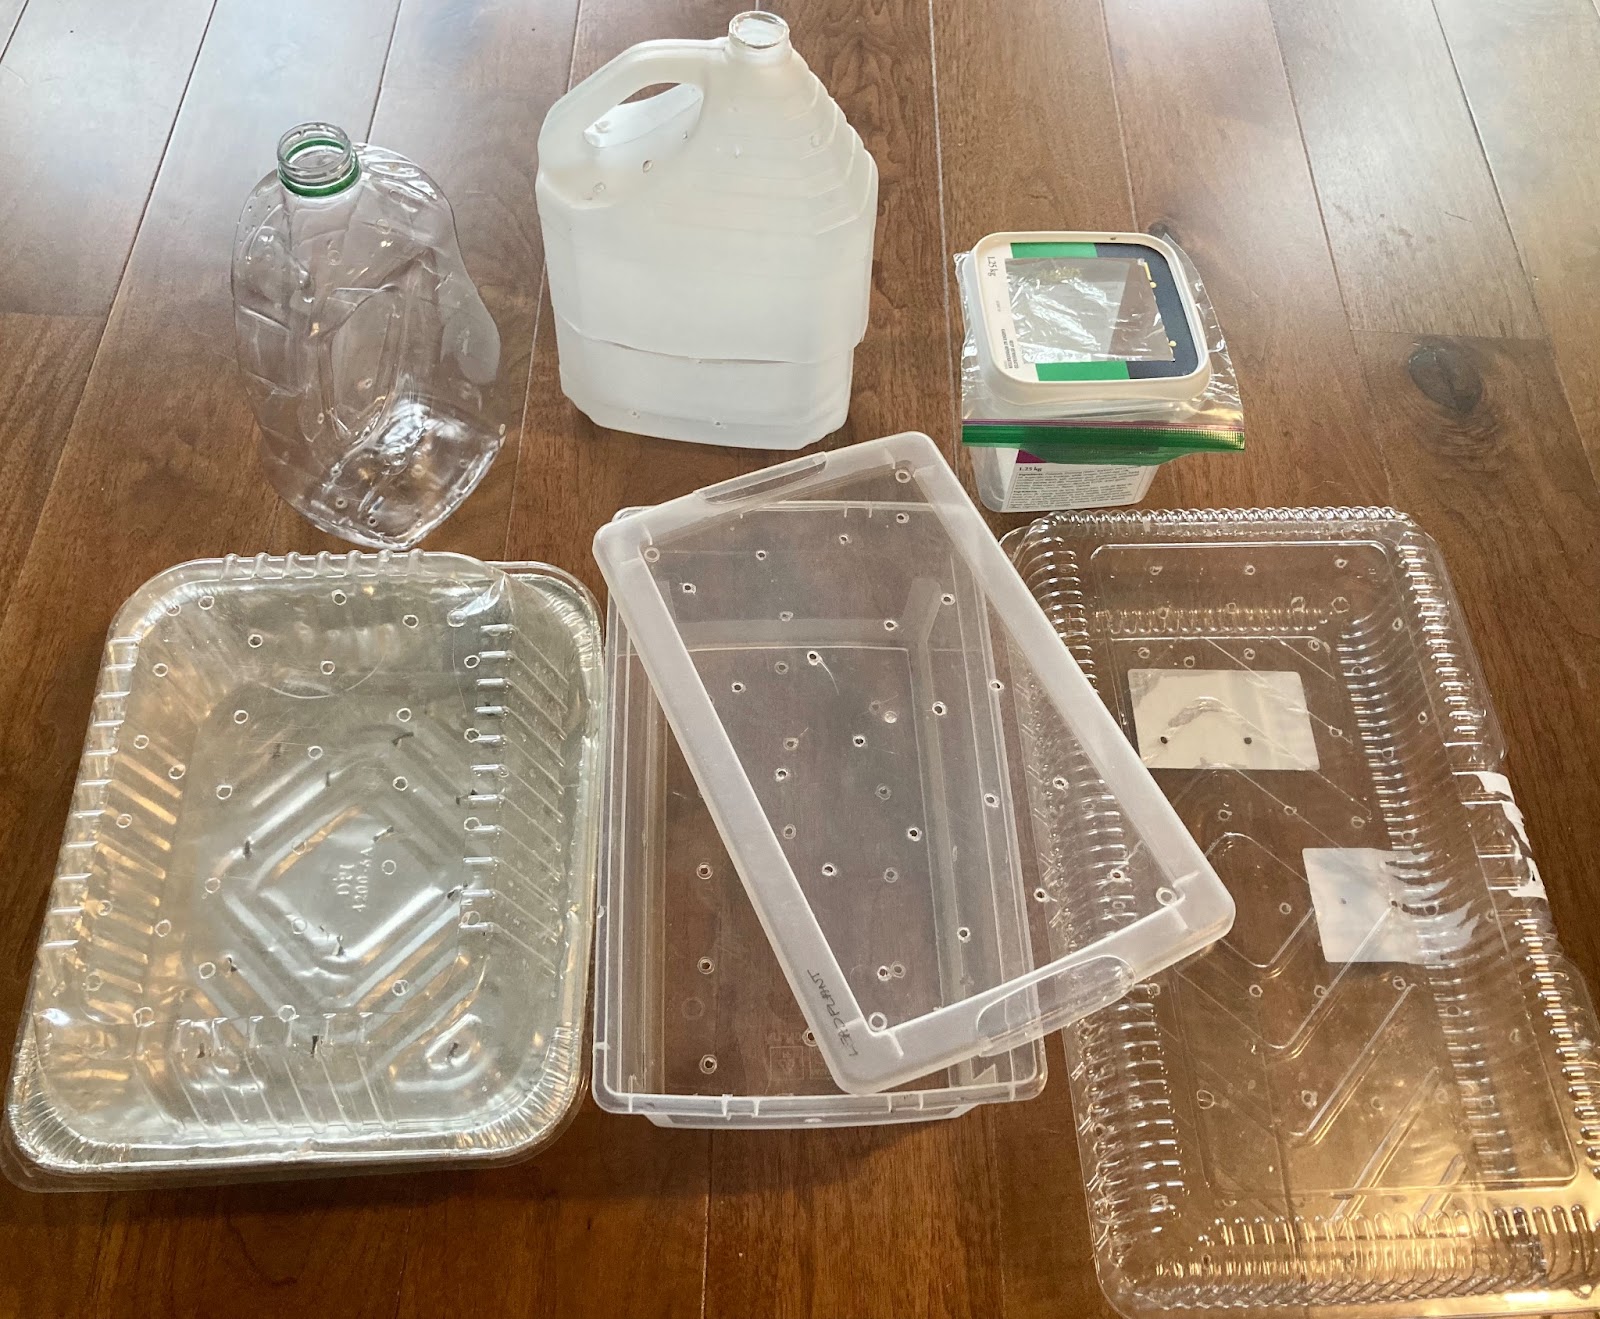
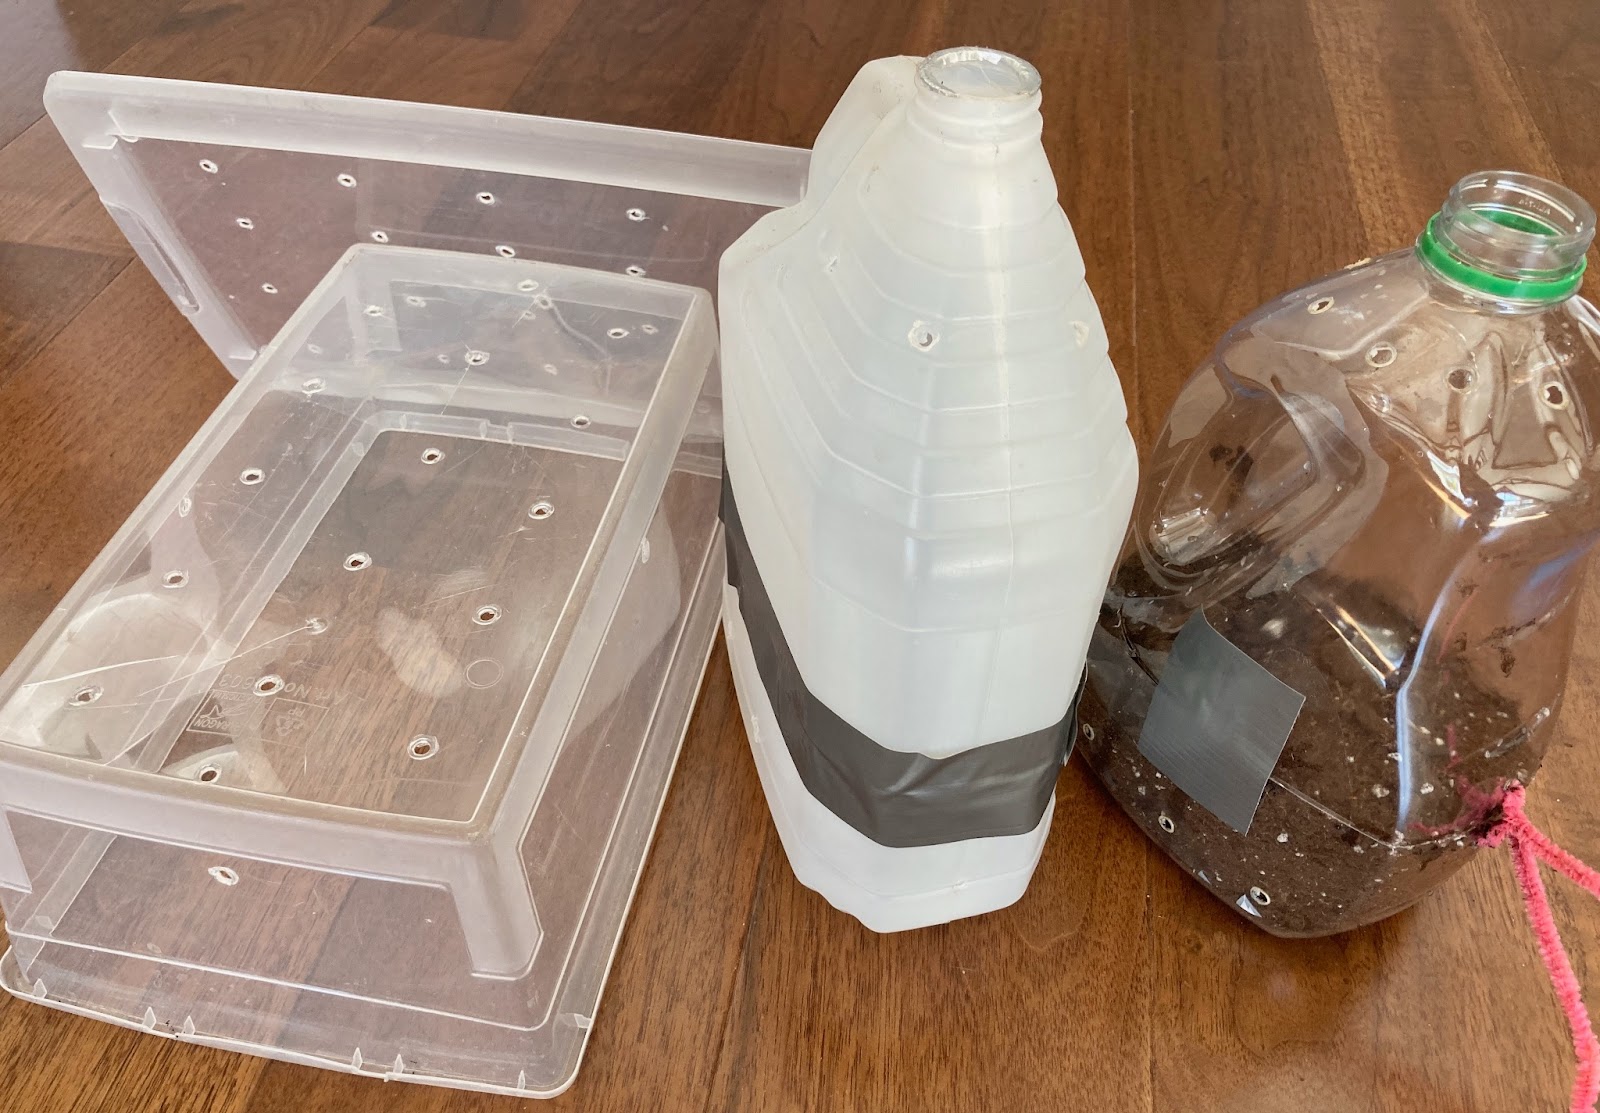
- Transparent or translucent containers with enough height to hold soil and accommodate emerging seedlings. Recycled milk, juice and vinegar jugs (well washed) are perfect. Clear coloured jugs work too. Discard all screw tops. Clam shells that salads come in. Foil trays with plastic lids (Dollar Tree) and also clear plastic totes.
- A cheap drill or soldering iron to make holes for drainage, ventilation and letting the elements in.
- Scissors to cut the jugs.
- A garden pen or paint pen to mark the outside of your container. Sharpies will fade.
- Plant labels/tags for inside your container. These are helpful for when you eventually take the lids off.
- Potting Mix: Get it as soon as you can, stocks will be low at this time of year.
- DO NOT BUY ‘weed free’ mix as there are chemicals in it to kill weed seeds which will also kill your seeds. Potting mix with ‘moisture control’ as it may become water-logged. ‘Seed starter’ mix as it will not have enough nutrients in it to support seedlings. Cheap mixes, i.e. from a dollar store, as they are renowned for poor germination rates.
- Duct tape.
If you are using jugs, put a few holes around the top opening to allow extra snow and rain to get in – they will also act as ventilation holes. You will also need drainage holes in the bottom of the containers and one or two on each side, about 1” up, to allow for extra draining.
NOTE: I used a drill my first year to make the holes and found it took a long time and was a little dangerous. I now use a basic soldering iron bought from Amazon for around $20 and it makes the holes quickly. However, you need to do this in a ventilated area.
Some sites suggest the tip of a glue gun, which I tried with little success.
It is easier to make the holes before you cut your jugs. Then cut around the jug, at least 5 inches high, leaving a ‘hinge’ at the back.
You can start winter sowing anytime between late December to March, no earlier.
Most, but not all, native perennials require cold stratification. Some require 90 days, some 60 and some 30. All your seeds can be sown at the same time and they will germinate when they are ready but, if you want to stagger sowing, start with the 90 day seeds. (Prairie Moon Nurseries germination guide). Hardy annual seeds can be sown in March and tender annuals after. Seeds from exotic plants will not work. Some vegetables can be winter sown and information about these and any other questions relating to winter sowing can be found on Winter Sowers Facebook page (an excellent resource!)
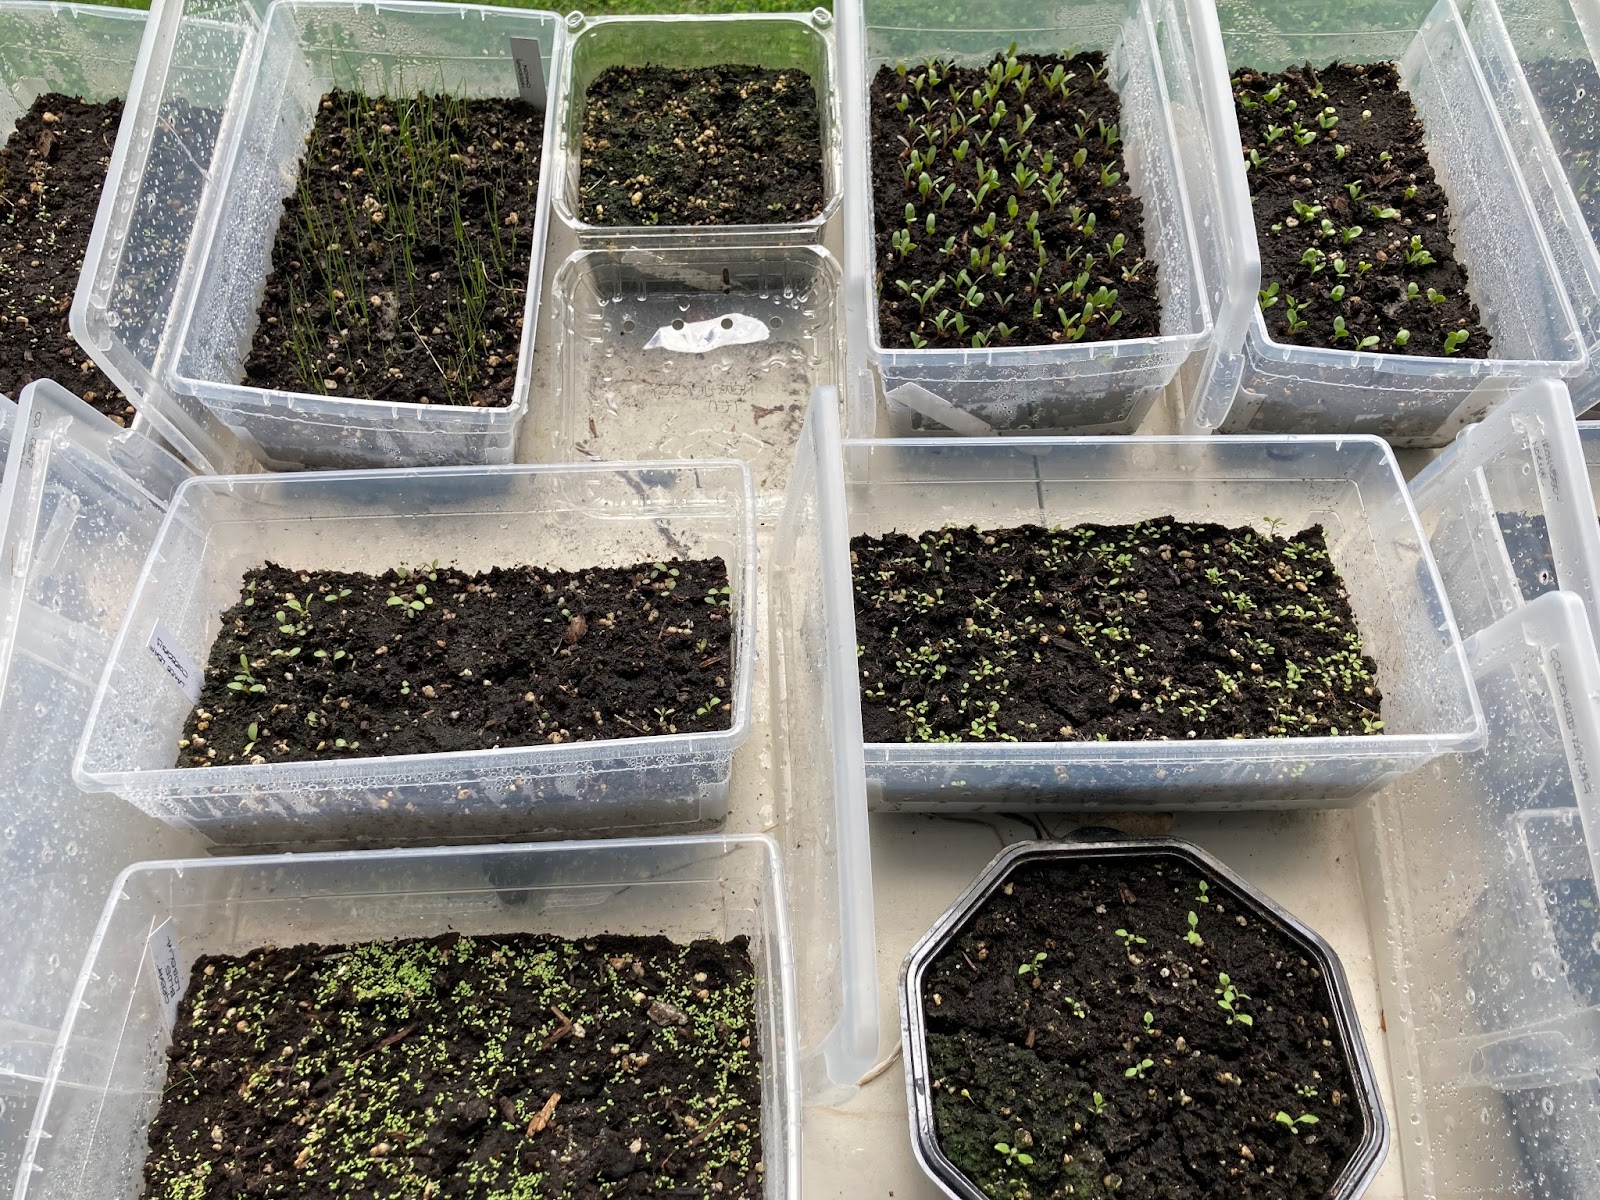
When you’re ready, fill your containers with 3 – 4 inches of moist soil (not dripping wet). Firm the soil lightly so that it doesn’t shrink down too much. The correct amount of soil will retain moisture. If there isn’t enough soil you’ll need to water more often. Some people use individual pots within their containers which is fine, but be aware that they may need more watering. Do not use fibre/peat pots as these will rot.
Sow your seeds. Small seeds like Cardinal flower, Asters and Goldenrods only need to be pressed into the potting mix. Larger seeds like Lanceleaf coreopsis will need a dusting of potting mix on top. Large seeds will need to be sown the same depth as the seed. Give them all a light spritz of water. NOTE: This works for most seeds but some specifically require light or dark to germinate. Prairie Moon Nurseries has a comprehensive guide to seed requirements.
Seal your containers. You can put duct tape completely around your jugs just or in a few places. Closing with pipe cleaners also works. Totes generally don’t require duct tape.
Place your containers outside in the elements, somewhere that allows them to drain (i.e. on pebbles or garden beds) and let Mother Nature do her work. The containers will probably disappear under the snow. There is nothing else to do until the seedlings begin to emerge except check occasionally that they have enough moisture … which they should. Ideally the best place for the containers is facing east where they will get morning sun and afternoon shade. Afternoon shade is important when the seedlings emerge. If this isn’t possible then you have to work with what you have. If you do have to place them facing south, they’ll be fine until the seedlings begin to emerge then you need to move them into afternoon shade or provide artificial shade and be more diligent about watering.
If the containers are in a particularly windy area you may want to secure them (some people use milk crates or tie them together).
Seeds will begin to emerge late March/early April. They come up when ready and sometimes different species come up weeks or more than a month apart. Check your seedlings for moisture and water as necessary. Don’t allow them to dry out.
When the temperature reaches zero Celsius during the day, remove the lids during the daytime but replace them at night. When nighttime temperatures are consistently above zero Celsius you can remove the lids permanently. If there’s an extremely hot day make sure to remove lids otherwise your seedlings will cook.
Once your seedlings have at least two sets of true leaves and are around two inches tall, you can plant them. It’s fine to leave them a little longer. Some people transfer them to nursery beds or pots to continue growing, but this isn’t necessary. If you have a lot of seedlings you can use the ‘hunk of seeds’ method, which means cutting them into brownie sized pieces and planting them. This works well.
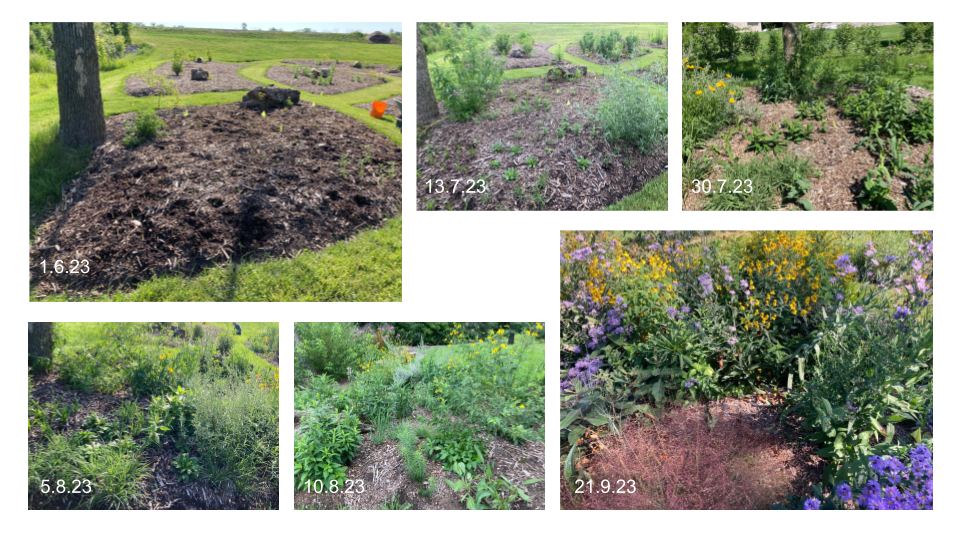
Here are a sequence of dated pictures of one of the pollinator beds I planted this year containing only seedlings from seeds winter sown in January of 2023 (apart from the Grey Headed Coneflower by the tree). In the first picture, the bed is full of seedlings which you can barely see. These include Liatris, Goldenrod, Asters, Ironweed, a variety of Milkweed, Spotted Bee Balm, Lanceleaf Coreopsis and a variety of grasses. Their growth was remarkable. Following the dates, you can see the growth progression. The last picture, taken on the 21st September, shows strong, mature, flowering plants. The ‘brown’ bit at the bottom is Purple Love Grass going to seed.
References
- Prairie Moon Nurseries germination guide
- Clean North: seed collecting and how to remove chaff
- Winter sowers Facebook page (look at ‘Guides’ and ‘Featured’)
- All the dirt on native seed collecting and All the dirt on winter sowing, University of Maryland Extension